What are CMS Pages and how do I manage CMS Pages on Pixopa?
CMS Pages are full pages that are available via their own URL addresses. Pages like About Us, Our Team, Help, FAQ, etc, can be added and edited using CMS.
To add pages, look for the CMS menu in Pixopa Admin, and click on Pages option. Click on ‘Add New Page’ button on the top right of this page.(To edit any existing page, click on the row of the page you want to edit.)
This will open a new page with 4 tabs.
General Information
Content
Custom Design
Meta Data
General Information
You need to enter general identification information for your page in this tab.
Page Title: Enter the title you want to give to your page (like About Us, FAQ, etc)
URL Key: Enter the URL key for your page. This will be added to your website base URL to create the URL of your CMS page.
Status: Select Enable if you want this page to be accessible by users, otherwise select disable.
Content
You can add your page content in this tab.
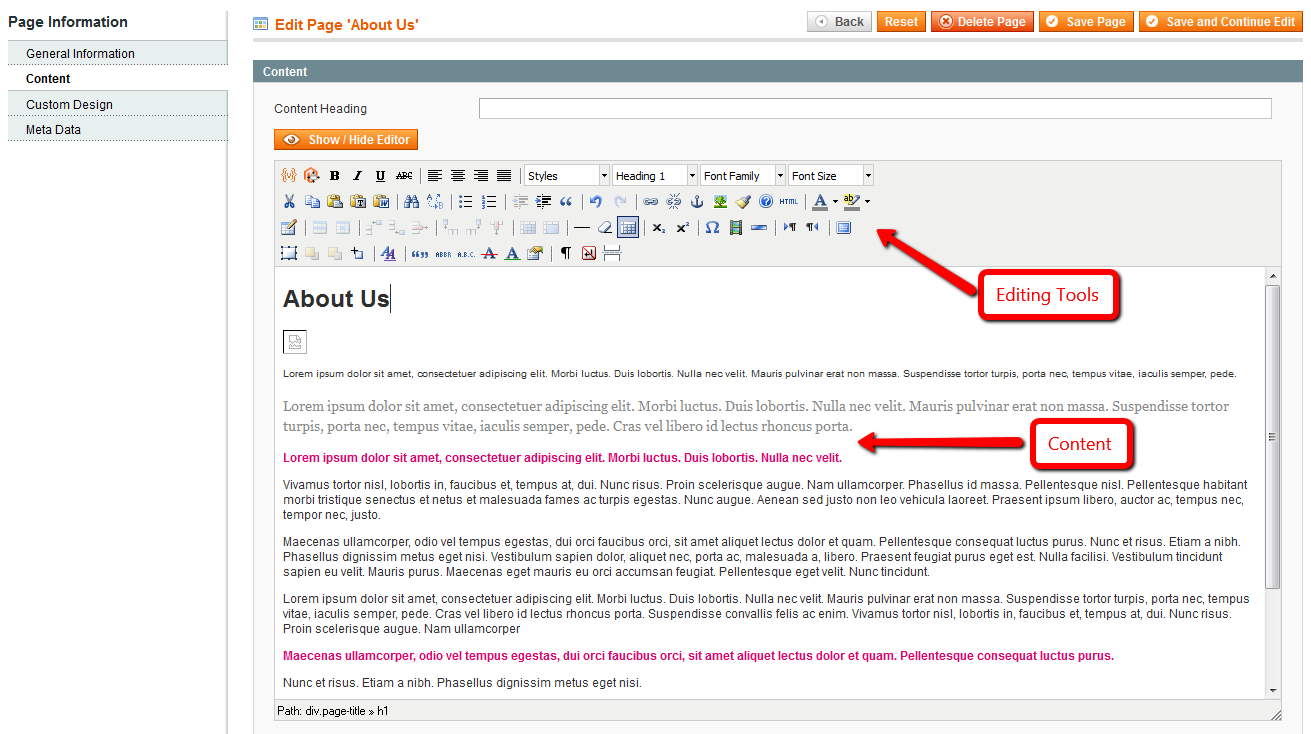
Content Heading: Add the heading for your content here. This will be displayed at the top of your CMS page.
WYSIWYG Editor: WYSIWYG simply means What You See Is What You Get. If your WYSIWYG editor is on, the page will look like this
If the page doesn’t appear like this, click on Show/Hide Editor button to show WYSIWYG toolbar.
-
Now, you can type your content, and use following editing options on it:
Apply Bold, Italic, Underline, Strikethrough, aligning it left, right, centre, change font size, style, font family,etc
Cut, copy, paste, find and replace, apply numbering and bullets, increase or decrease indent, change font color, etc.
Add images, tables, videos, convert text or image to a link, edit tables, add/delete table columns and rows.
Add layers, arrange objects, insert page breaks, and a lot more…
Once you have finished adding the content to the page, you can click on ‘Save and Continue Edit’ button on top right of page. This will save contents on this page.
Custom Design
Here you can change design of your CMS page.
-
Layout: Select the layout you want for your page:
Empty: Displays the CMS page without any objects, except for the content (products or static blocks only).
1 column: Displays the contents as well as the header, footer, search field, and navigation bar.
2 columns with left bar: Adds the left column to the 1 column display.
2 columns with right bar: Adds the right column to the 1 column display
3 columns: Displays both the left and the right columns with the content in centre
Custom Design:The Custom Design section enables you to define a custom theme and layout to be used for a defined period of time. This feature allows you to create custom themed pages for holidays or special sales periods (for example, a Christmas theme, or Thanksgiving Weekend Sale).
Select a Custom Design From and Custom Design To date that will define the period for which this custom design will be used
In the Custom Theme drop-down menu, select the pre-defined Theme that will be used during this period.
In the Custom Layout drop-down menu, select the number of columns for the custom page layout.
In the Custom Layout Update XML field, you can customize the information displayed in the layout using XML.
Meta Data
Meta Data is descriptive information about a page that search engines may use to index your store’s pages. This content is not visible directly on your website.
In Keywords, define keywords that are relevant to this content page. It is helpful to consider keywords that potential customers may search if they were searching for your content on the Web.
In Description, write a few sentences describing the content on the page. Though it is not visible on your page itself, some search engines will list this page’s search result using the Meta Description text.
Robot: Add the following robots meta tag in the HTML source of your website page:
INDEX, FOLLOW: The spider will now index your whole website. The spider will not only index the first web-page of your website but also all your other web-pages.
INDEX, NOFOLLOW: If you don’t want the search engine spider to crawl through your whole website you use the following meta tag. The spider will now only look at this page and stops there.
NOINDEX, FOLLOW: The spider will not look at this page but will crawl through the rest of the pages on your website.
NOINDEX, NOFOLLOW: The spider will not look at this page and will NOT crawl through the rest of your web-pages.
Click on Save Page button when you finish editing this page.